Create the Athena Table
Create the Athena Table
In this section, we will peform the following operations:
- Capture CloudFormation Parameters
- Create an Amazon Sagemaker Notebook Instance
- Run code in Jupyter to create the Athena tables and views from the S3 flight data 4.
Capture CloudFormation Parameters
Your account has been pre-provisioned with a Glue Development Endpoint and S3 bucket for Athena results.
- Navigate to the CloudFormation console
- Click on the stack called flight-endpoint
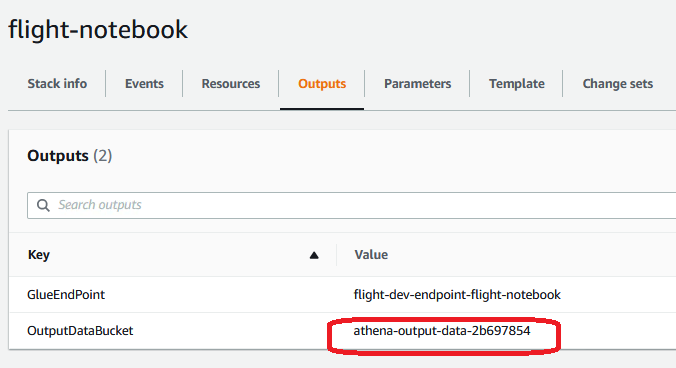
- Click on the Outputs header and copy the value of OutputDataBucket. You will use this during the Athena portion.
Create Sagemaker Notebook
First, we’ll ensure your AWS Glue dev endpoint is READY by following these steps. The AWS Glue dev endpoint was automatically created for you by the AWS CloudFormation template.
- Navigate to the AWS Glue console
- In the left menu, under ETL, click Dev endpoints
- Find the dev endpoint beginning with flight-dev-endpoint- and verify that the status is READY.
- Select the endpoint checkbox and from Actions, select Create Sagemaker Notebook

- For Notebook name, enter flight-notebook
- Select Choose an existing IAM role then choose AWSGlueServiceSageMakerNotebookRole-flight
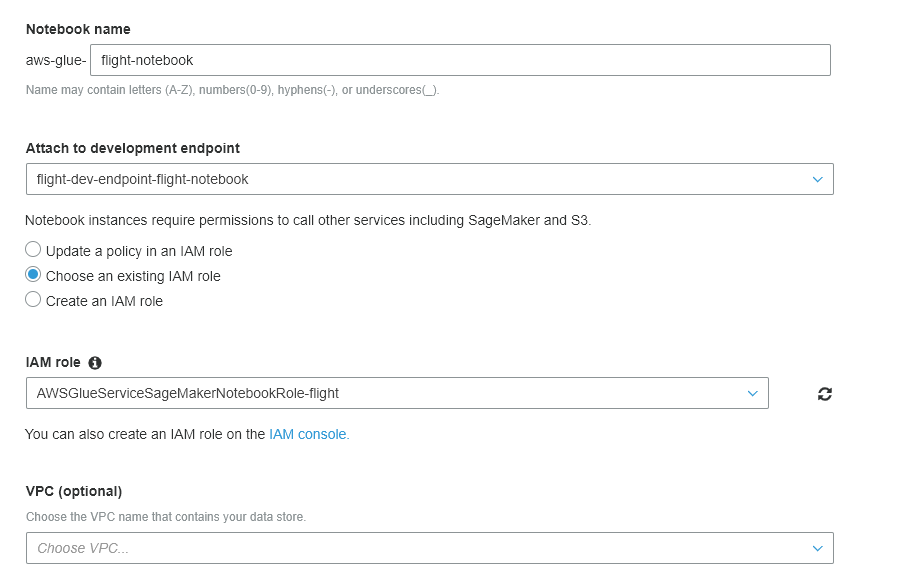
- Leave other options as the default, and then click Create notebook, which will take you back to the Notebooks page.
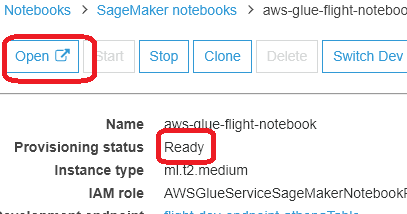
- You should notice a notebook with the name aws-glue-flight-notebook and the status Starting.
The Amazon SageMaker notebook should take about 6 minutes to transfer into a Ready status. Once it is, proceed to the next step.
Run Python Code in Jupyter
You will need to download a Jupyter notebook file and then upload it to the Sagemaker Notebook we just created.
- Download the following file: Athena_API.ipynb (You may need to right-click and select Save File…)
- Once the Notebook is in a READY state, click on the Notebook name and then click Open. If a popup appears, click OK. This will open in a new browser tab and display the Jupyter interface
- Once the Jupyter interface appears, click the Upload button in the upper right corner.
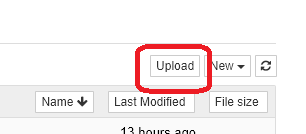
- Browse to and select the file you just downloaded (Athena_API.ipynb), and finally click Upload to complete the process.

- Click on the Athena_API.ipynb file to open the notebook.
- In the environment setup portion, you will see the following code: s3_loc = ‘s3://athena-output-jeetesh/redshiftadmin/testexec1’. Replace the athena-output-jeetesh portion with the bucket name that you copied earlier from the CloudFormation output.

- Interactively run each cell in the Jupyter notebook. You can do this by pressing the Run button or using SHIFT+ENTER.

The instruction set in this notebook will ultimately create a partitioned table and view in Athena, which we will use to query via Amazon QuickSight. You can view these new tables in default database located in the Amazon Athena Console.